So I’m keeping it simple this year with my Halloween pattern.
Not a lot of legs on this one; the whole job is done in three pieces and a lack of precision with embroidery is favorable. Don’t worry, I’m not through with spiders but I don’t want to fall into too much of a pattern-pattern.
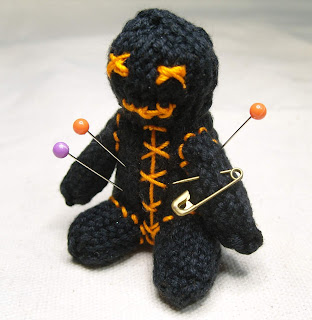
So why not knit your very own pocket sized voodoo doll?
 |
| Or voo-dude as Puffits and I have been calling it. |
I know there are a lot of patterns out there for making them—if you even need a pattern, as they’re essentially a few shapes put together to create a human form—but I wanted mine to have a specific look and structure.
Mostly I wanted one that could sit up on its own, on a desk, the dashboard of a car, or beside you on a park bench—should you see anyone littering…
I feel like I need a disclaimer.
I advise only using your voodoo doll for good…
That’s somewhat vague and subjective statement.
Let’s just say, your pins: your consequences.
Okay then, let’s get on to what you need.
Yarn and Needles:
The dolls in the photos are made with Cotton Fair from Premier Yarns, which is a 2/fine weight. You shouldn’t need more than maybe a couple dozen yards, if that.
You’ll need four double pointed needles (DPNs) as most of the pattern is knit in the round. I used U.S. size 2 (2.75 mm)
This combo yields a doll that is roughly 2.5 inches from head to butt and 1.5 inches from butt to feet.
Additional Supplies:
Stuffing: Polyfill can be used but it’s not ideal in this case, particularly if you’re going to be using your doll as a pincushion. You’ll want something a little sturdier. I’ve gotten good results with wool roving/spinning fiber. You can use yarn scraps, bits of fabric, or even create a small fabric pouch with sand or sawdust. As I’ve recently learned, that’s how pin cushions were used back in the day.
Stitch holder: To hold stitches when the legs are divided.
Embroidery floss or thin crochet thread: I recommend a contrasting color. You may also want to give your doll button or bead eyes but that’s option. Personally I prefer the look of a couple Xs.
Tapestry needle: To assemble and embroider.
Techniques And Abbreviations
Knit-in-the-Round
Knit Straight
Cast On (CO)
Knit (K)
Purl (P)
Knit Front and Back (Kfb)
Knit Two Together (K2tog)
Slip slip knit (Ssk)
Sl (Slip)
Psso (Pass slipped stitch over)
Draw-Through
Round (Rnd)
Short Row (Srt Row)
Wrap & Turn (W&T)
Stitch/es (st/s)
Total stitches are indicated within ( ) after increase and decrease rounds. Stitches to be repeated are indicated within [ ] and { }.
The body and the legs are knit in one piece. The arms are knit separately and attached.
Body
Starting at the top of the head, CO 6 sts and join on DPNs to knit the following rounds:
Rnd 1: [K1, Kfb] 3 times. (9 sts)
Rnd 2: [K1, Kfb, K1] 3 times. (12 sts)
Rnd 3: [K1, {Kfb} twice, K1] 3 times. (18 sts)
Rnd 4: [K1, Kfb, K2, Kfb, K1] 3 times. (24 sts)
Rnds 5-7: K all sts.
Rnd 8: [K1, K2tog, K2, Ssk, K1] 3 times. (18 sts)
Rnd 9: K all sts.
Rnd 10: [K1, K2tog, Ssk, K1] 3 times. (12 sts)
Rnd 11: K all sts.
Rnd 12: K1, [Kfb] twice, K6, [Kfb] twice, K1. (16 sts)
Rnd 13: K all sts.
Rnd 14: K1, Kfb, K2, Kfb, K6, Kfb, K2, Kfb, K1. (20 sts)
Rnd 15: K all sts.
Rnd 16: K1, Kfb, K4, Kfb, K6, Kfb, K4, Kfb, K1. (24 sts)
Rnds 17-22: K all sts.
You can stuff the head and upper body at this point but you’ll also have the opportunity to do so a little later.
The following short rounds will turn the body so the doll sits upright. If you’d like your doll to lay flat or appear as though it’s standing upright, skip this part and move on to the legs.
Short Rows
Srt Row 1: K6, W&T
Srt Row 2: P12, W&T (Knitting past the beginning of the round.)
Srt Row 3: K11 W&T
Srt Row 4: P10 W&T
Srt Row 5: K9 W&T
Srt Row 6: P8 W&T
Srt Row 7: K9 W&T (Work the wrap as you come to them.)
Srt Row 8: P10 W&T
Srt Row 9: K11 W&T
Srt Row 10: P12 W&T
Srt Row 11: K6 returning to the beginning of the round.
Knit one more full round before dividing for the legs.
Legs
You’ll now want to stuff the majority of the body. Depending on your stuffing material, it will be easier to shape and manipulate the doll if the stuffing is in smaller pieces. If you’re using polyfill or roving, pull it apart into smaller portions. If you’re using yarn or fabric scraps, make sure they’re in short and dense/layered portions.
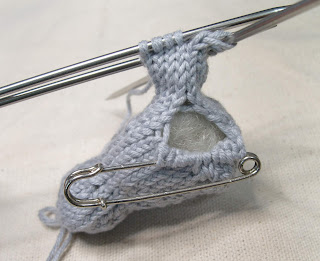
Place the first 12 sts on a holder. Move the remaining 12 sts onto DPNs to knit in the round and create the right leg.
Try to keep the start and end of the round together so there isn’t a large gap between the first and last stitch.
Rnds 1-7: K all sts.
Rnd 8: [K1, K2tog, K1] 3 times. (9 sts)
Rnd 9: [Sl 1 st, K2tog, Psso] 3 times (3 sts)
Draw through to close. Weave in end.
Lightly stuff the right leg before moving onto the left. Make sure the body is as stuffed as you like it at this point; it will be much harder to access the interior of your doll once the left leg is knit.
Shift the 12 sts from the holder onto DPNs. Reattach the yarn at the belly, just behind the last st. If you leave a long tail, it can be used to close up any gap between the leg divide.
Again, try to keep the start and end of the round tightly together as the first round is completed to minimize the gap between the legs.
Repeat the leg rounds above. Remember to lightly stuff the interior of the leg before the decrease and draw through after completing Rnd 9.
Arms
The arms start with straight rows and are joined in the round.
CO 4 and knit straight:
Row 1: K1, [Kfb] twice, K1. (6 sts)
Row 2: P all sts, CO 3. (9 sts)
Row 3: K all sts.
Join with DPNs and knit 7 rnds.
To close: [Sl 1 st, K2tog, Psso] 3 times. (3 sts)
Draw through to close. Weave in end. I like to draw this end up through the interior of the arm and use it as stuffing.
Repeat the above to make a second arm.
Assembly
Attach the arms to the sides of the body, connecting the cast on ends.
Close up any gap left behind by the leg divide.
Once assembled, create any decorative seams and stitches and/or accents like a heart.
Embroider a mouth and eyes or use buttons.
Have fun with this part since this is what will define the expression and state of your doll. If you’re crap at embroidery, as I am, this can work in your favor, although there’s nothing wrong with a voodude with very precise yet spooky stitching.
Of course this is also your opportunity to make it look like someone specific—if you choose—but that’s entirely between you and your victim. Before you go jabbin’ don’t forget all returns three-fold!
Happy Halloween, friends.
Stay safe, be kind, knit happy, oh, and hand out the full-size candy bars.
Seriously, there’s no better way to reap some trick-or-treating joy as an adult than being the house that hands out the full size candy bars. You can freeze what’s left over and make Thanksgiving brownies or cookies but there are never any leftovers once the word gets out.


