
I’m not a big fan of squirrels. A family of them once moved into the roof of the cottage and made my nights pretty miserable with the racket from all their… squirrel business. The only thing worse was when the raccoon moved in the following winter and then gave birth to a litter above my bedroom. How did I end up with so much wildlife as “upstairs” neighbors? I’ll just say my landlord wasn’t very proactive about anything, including repairing major access points in the roof. And as someone who can confidently state there is no such thing as a truly “squirrel-proof” bird-feeder, they still get on my nerves.
There is one variety of squirrel I very much enjoy and look forward to this time of year: the morbidly obese type.
So I thought, what better way to celebrate fall and stave off seasonal affective disorder than to create a morbidly obese squirrel ornament pattern using an ordinary pingpong ball.
There is one variety of squirrel I very much enjoy and look forward to this time of year: the morbidly obese type.
So I thought, what better way to celebrate fall and stave off seasonal affective disorder than to create a morbidly obese squirrel ornament pattern using an ordinary pingpong ball.

The pattern is something of a variation and a little bit of an improvement—I think—on the Fat Cat Bauble pattern. I think the pingpong ball is somewhat easier to work with than the plastic bauble.
Pingpong balls are also easier to find year-round. You probably won’t even need to go to a sporting goods store; I got mine in the grocery store—same aisle as the Solo cups.

Pingpong balls are also easier to find year-round. You probably won’t even need to go to a sporting goods store; I got mine in the grocery store—same aisle as the Solo cups.

You could still fit this pattern to plastic craft bauble. I’ll provide some notes on that at the end of the body portion below. You can also skip the bell/acorn part and just leave the paws free or attach all manner of other objects: little knit walnuts, tiny jars of peanut butter, chunks of insulation from my old roof.
So here’s what you’ll need to make your own obese squirrel bauble ornament:
Yarn and Needles:
I used Paton’s Kroy Socks yarn for the majority of the squirrel. The color is Flax. A few dozen yards of any sock weight/fine yarn should do. The belly is knit in white Caron Simply Soft Light. Sadly, it’s been discontinued, but any sock weight yarn in an appropriate belly color should do. The acorn cap over the bell is made with Woollike from Loops & Threads, a super fine yarn that’s a Micheal’s exclusive. The color is chocolate. A small amount of brown crochet thread has been used to embroider the nose.
You’ll need 4 DPNs (double pointed needles) - size US 1 (2.22mm).
Gauge: 10 sts for 14 rows in stockinette = 1 inch (2.54 cm)
Unlike most of my patterns, gauge matters a bit for this one-- mostly because you’ll want to make sure the pingpong ball is properly covered and all the other parts are in proportion.
So here’s what you’ll need to make your own obese squirrel bauble ornament:
Yarn and Needles:
I used Paton’s Kroy Socks yarn for the majority of the squirrel. The color is Flax. A few dozen yards of any sock weight/fine yarn should do. The belly is knit in white Caron Simply Soft Light. Sadly, it’s been discontinued, but any sock weight yarn in an appropriate belly color should do. The acorn cap over the bell is made with Woollike from Loops & Threads, a super fine yarn that’s a Micheal’s exclusive. The color is chocolate. A small amount of brown crochet thread has been used to embroider the nose.
You’ll need 4 DPNs (double pointed needles) - size US 1 (2.22mm).
Gauge: 10 sts for 14 rows in stockinette = 1 inch (2.54 cm)
Unlike most of my patterns, gauge matters a bit for this one-- mostly because you’ll want to make sure the pingpong ball is properly covered and all the other parts are in proportion.
Additional Supplies:
A pingpong ball for the body, a small amount of stuffing or yarn scraps, safety eyes (7.5mm for the size shown in the photos), a 1/2 inch (12.7 mm) jingle bell, cord or ribbon to suspend the ornament, a tapestry needle for assembly, and straight pins--if needed--to assist with positioning during assembly.
A pingpong ball for the body, a small amount of stuffing or yarn scraps, safety eyes (7.5mm for the size shown in the photos), a 1/2 inch (12.7 mm) jingle bell, cord or ribbon to suspend the ornament, a tapestry needle for assembly, and straight pins--if needed--to assist with positioning during assembly.
Techniques And Abbreviations:
Knit-in-the-Round
Knit Straight
Cast On (CO)
Bind Off (BO)
Knit (K)
Purl (P)
Make One (M1)
Knit Front and Back (Kfb)
Knit Two Together (K2tog)
Slip slip knit (ssk)
Slip (Sl)
Pass slipped stitch over (psso)
Draw-Through
Round (Rnd)
Short Row (Srt Row)
Wrap & Turn (W&T)
Stitch/es (st/s)
Total stitches are indicated within ( ) after increase and decrease rounds. Stitches to be repeated are indicated within [ ] followed by the number of repeats.
Knit-in-the-Round
Knit Straight
Cast On (CO)
Bind Off (BO)
Knit (K)
Purl (P)
Make One (M1)
Knit Front and Back (Kfb)
Knit Two Together (K2tog)
Slip slip knit (ssk)
Slip (Sl)
Pass slipped stitch over (psso)
Draw-Through
Round (Rnd)
Short Row (Srt Row)
Wrap & Turn (W&T)
Stitch/es (st/s)
Total stitches are indicated within ( ) after increase and decrease rounds. Stitches to be repeated are indicated within [ ] followed by the number of repeats.
The pingpong ball cover is knit in one piece. The head, tail, and limbs are knit separately and attached. The acorn cap is knit separately, attached to the bell, and stitched between the squirrel’s paws.


Body - Covering the Pingpong Ball
CO 6 sts, distribute evenly on 3 DPNs (2 sts per needle to start) and knit the following rnds:
Rnd 1. [K1, M1, K1] 3 times (9 sts)
Rnd 2. [Kfb, K1, Kfb] 3 times (15 sts)
Rnd 3. [Kfb, K3, Kfb] 3 times (21 sts)
Rnd 4. [Kfb, K5, Kfb] 3 times (27 sts)
Continue in this manner—inc on the first and last st of each DPN—until there are 17 sts on each needle (51 sts total).
Knit 8 rnds even before beginning decrease rnds below.
To decrease:
Dec Rnd 1. [K2tog, K13, Ssk] 3 times (45 sts)
Dec Rnd 2. [K2tog, K11, Ssk] 3 times (39 sts)
Dec Rnd 3. [K2tog, K9, Ssk] 3 times (33 sts)
CO 6 sts, distribute evenly on 3 DPNs (2 sts per needle to start) and knit the following rnds:
Rnd 1. [K1, M1, K1] 3 times (9 sts)
Rnd 2. [Kfb, K1, Kfb] 3 times (15 sts)
Rnd 3. [Kfb, K3, Kfb] 3 times (21 sts)
Rnd 4. [Kfb, K5, Kfb] 3 times (27 sts)
Continue in this manner—inc on the first and last st of each DPN—until there are 17 sts on each needle (51 sts total).
Knit 8 rnds even before beginning decrease rnds below.
To decrease:
Dec Rnd 1. [K2tog, K13, Ssk] 3 times (45 sts)
Dec Rnd 2. [K2tog, K11, Ssk] 3 times (39 sts)
Dec Rnd 3. [K2tog, K9, Ssk] 3 times (33 sts)
Continue in this manner, checking to ensure that the pingpong ball can be easily slipped inside. Once there is resistance, leave the pingpong ball within and knit until there are 3 sts on each needle (9 sts total). You’ll need to stretch yarn as you go to make it easier to knit while the pingpong ball is inside.
To close up the yarn:
Sl 1, ssk, psso. 1 st now remains on each DPN (3 sts total).
Cut yarn and draw through remaining sts.
To close up the yarn:
Sl 1, ssk, psso. 1 st now remains on each DPN (3 sts total).
Cut yarn and draw through remaining sts.
Notes on adapting this pattern to a plastic bauble:
If you are knitting this to cover a plastic bauble, you’ll need to adapt the above steps to fit the circumference of the bauble. You may want to increase the yarn weight and DPN size. It will probably also be necessary to work more increase rnds. Once you’ve increased enough to fit the circumference of the bauble, knit enough even rnds to easily pull the cover to the upper third of the bauble’s height, then begin decreasing.
This may require some trial and error. Too few sts and rnds will make the yarn appear stretched and reveal large gaps. Too many will cause bunching where each DPN meets the next. There should be just enough give to allow the bauble to be easily slipped into the yarn after the first several decrease rnds are worked. Stop decreasing when the cover can be easily pulled up to the top opening/spring cap. Cut the yarn and draw through remaining stitches, securing the cover in place so it fits around the neck of the opening. You can then use the tail to close any gaps from where the DPNs met.
Check out the Fat Cat Bauble pattern to see how this looks.
Check out the Fat Cat Bauble pattern to see how this looks.
Head and Belly
CO 6 sts on 3 DPNs and knit the following rnds:
Rnd 1. [K1, Kfb] 3 times (9 sts)
Rnd 2. K all sts
Rnd 3. [K1, Kfb, K1] 3 times (12 sts)
Rnd 4. [K1, Kfb] twice, K4, [Kfb, K1] twice (16 sts)
Rnd 5. K all sts
Rnd 6. [K2, Kfb] twice, K4, [Kfb, K2] twice (20 sts)
The following short rows will round the back of the squirrel's head.
Srt Row 1. K15, W&T
Srt Row 2. P10, W&T
Srt Row 3. K9, W&T
Srt Row 4. P8, W&T
Srt Row 5. K9, W&T - Now working wrapped stitches.
Srt Row 6. P10, W&T
Srt Row 7. K11, W&T
Srt Row 8. P12, W&T
Srt Row 9. K17 to end
Resume knitting in the round.
Rnd 1. K all sts
Rnd 2. K2, K2tog, K12, ssk, K2 (18 sts)
Rnd 3. K2, BO 14 sts, K2 (4 sts)
Put remaining 4 sts on one needle to knit belly.

Break body yarn, leaving enough of a tail to assist with assembly later, and attach white/belly yarn and knit the following rows.
Row 1. [Kfb] 4 times (8 sts)
Row 2. P all sts
Row 3. Kfb, K6, Kfb (10 sts)
Row 4. P all sts
Row 5. Kfb, K8, Kfb (12 sts)
Row 6. P all sts
Row 7. Kfb, K10, Kfb (14 sts)
Row 8. P all sts
Row 9. Kfb, K12, Kfb (16 sts)
Row 10. P all sts
Row 11. K2tog, K12, ssk (14 sts)
Row 12. P all sts
Row 13. K2tog, K10, ssk (12 sts)
Row 14. P all sts
Row 15. K2tog, K8, ssk (10 sts)
Row 16. P all sts
Row 17. K2tog, K6, ssk (8 sts)
Row 18. P all sts
Row 19. K2tog, K4, ssk (6 sts)
Row 20. P all sts
Row 21. K2tog, K2, ssk (4 sts)
BO, leaving a long tail.
Ears
Make two
CO 4, leaving a long tail, and knit the following rows:
Row 1. K1, [Kfb] twice, K1 (6 sts)
Row 2. P2, P2tog, P2 (5 sts)
Row 3. K1, Sl 1, Ktog, psso, K1 (3 sts)
Row 4. Sl 1, P2tog, psso.
Draw through to close.
Make two
CO 4, leaving a long tail, and knit the following rows:
Row 1. K1, [Kfb] twice, K1 (6 sts)
Row 2. P2, P2tog, P2 (5 sts)
Row 3. K1, Sl 1, Ktog, psso, K1 (3 sts)
Row 4. Sl 1, P2tog, psso.
Draw through to close.
Front Paws
Make two
CO 6, leaving a long tail, and knit the following rows:
Row 1. K1, Kfb, K2, Kfb, K1 (8 sts)
Row 2. P all sts
Row 3. K1, Kfb, K4, Kfb, K1 (10 sts)
Row 4. P all, CO 2 sts. (12 sts)
Row 5. K all sts
Distribute all sts on 3 DPNs to knit the following rnds:
Rnds 1- 4. K all sts
Rnd 5. [K1, K2tog, K1] 3 times (9 sts)
Rnds 6-8. K all sts
Rnd 9. [Sl 1, K2tog, psso] 3 times (3 sts)
Cut yarn and draw through remaining sts.
Lightly stuff the lower portion of the paw.
Back Feet
Make two
CO 6, leaving a long tail, and knit the following rows:
Row 1. K1, Kfb, K2, Kfb, K1 (8 sts)
Row 2. P all sts
Row 3. K1, Kfb, K4, Kfb, K1 (10 sts)
Row 4. P all, Co 2 sts. (12 sts)
Row 5. K all sts
Distribute all sts on 3 DPNs to knit the following rnds:
Rnds 1-3. K all sts
Rnd 4. [K1, K2tog, K1] 3 times (9 sts)
Rnd 5. [Sl 1, K2tog, psso] 3 times (3 sts)
Cut yarn and draw through remaining sts.
Lightly stuff the lower portion of the foot.
Make two
CO 6, leaving a long tail, and knit the following rows:
Row 1. K1, Kfb, K2, Kfb, K1 (8 sts)
Row 2. P all sts
Row 3. K1, Kfb, K4, Kfb, K1 (10 sts)
Row 4. P all, Co 2 sts. (12 sts)
Row 5. K all sts
Distribute all sts on 3 DPNs to knit the following rnds:
Rnds 1-3. K all sts
Rnd 4. [K1, K2tog, K1] 3 times (9 sts)
Rnd 5. [Sl 1, K2tog, psso] 3 times (3 sts)
Cut yarn and draw through remaining sts.
Lightly stuff the lower portion of the foot.
Tail
CO 9, leaving a long tail, and knit the following rnds:
Rnds 1-2. K all sts
Rnd 3. [Kfb, K1, Kfb] 3 times (15 sts)
Rnds 4-7. K all sts
Rnd 8. K5, Kfb, K3, Kfb, K5 (17 sts)
Base of tail short rows:
Srt Row 1. K13, W&T
Srt Row 2. P11, W&T
Srt Row 3. K10, W&T
Srt Row 4. P9, W&T
Srt Row 5. K8, W&T
Srt Row 6. P7, W&T
Srt Row 7. K8, W&T - Now working wrapped sts.
Srt Row 8. P9, W&T
Srt Row 9. K10, W&T
Srt Row 10. P11 W&T
Srt Row 11. K to end
Resume knitting rnds.
K 10 rnds even.
Top of tail short rows
Srt Row 1. K5, W&T
Srt Row 2. P10 (Knitting past start of the rnd.) W&T
Srt Row 3. K9, W&T
Srt Row 4. P8, W&T
Srt Row 5. K7, W&T
Srt Row 6. P6, W&T
Srt Row 7. K3, to end
Resume knitting in the round, picking up wraps as you come to them:
Rnds 1-3. K all sts
Rnd 4. K4, [K2tog] twice, K1, [ssk] twice, K4 (13 sts)
Rnd 5. K4, K2tog, K1, ssk, K4 (11 sts)
Rnd 6. K1, K2tog, K5, ssk, K1 (9 sts)
Stuff the tail so it is firm but flexible.
Rnd 7. [S1, K2tog, psso] 3 times (3 sts)
Draw through to close.
CO 9, leaving a long tail, and knit the following rnds:
Rnds 1-2. K all sts
Rnd 3. [Kfb, K1, Kfb] 3 times (15 sts)
Rnds 4-7. K all sts
Rnd 8. K5, Kfb, K3, Kfb, K5 (17 sts)
Base of tail short rows:
Srt Row 1. K13, W&T
Srt Row 2. P11, W&T
Srt Row 3. K10, W&T
Srt Row 4. P9, W&T
Srt Row 5. K8, W&T
Srt Row 6. P7, W&T
Srt Row 7. K8, W&T - Now working wrapped sts.
Srt Row 8. P9, W&T
Srt Row 9. K10, W&T
Srt Row 10. P11 W&T
Srt Row 11. K to end
Resume knitting rnds.
K 10 rnds even.
Top of tail short rows
Srt Row 1. K5, W&T
Srt Row 2. P10 (Knitting past start of the rnd.) W&T
Srt Row 3. K9, W&T
Srt Row 4. P8, W&T
Srt Row 5. K7, W&T
Srt Row 6. P6, W&T
Srt Row 7. K3, to end
Resume knitting in the round, picking up wraps as you come to them:
Rnds 1-3. K all sts
Rnd 4. K4, [K2tog] twice, K1, [ssk] twice, K4 (13 sts)
Rnd 5. K4, K2tog, K1, ssk, K4 (11 sts)
Rnd 6. K1, K2tog, K5, ssk, K1 (9 sts)
Stuff the tail so it is firm but flexible.
Rnd 7. [S1, K2tog, psso] 3 times (3 sts)
Draw through to close.

Acorn Cap
CO 9 on DPNs and knit in the following rnds:
Rnds 1-2. K all sts
Rnd 3. [Kfb, K1, Kfb] 3 times (15 sts)
Rnd 4. Kfb, K3, Kfb] 3 times (21 sts)
Rnd 5. [Kfb, K5, Kfb] 3 times (27 sts)
Rnd 6. [Kfb, K7, Kfb] 3 times (33 sts)
Rnd 7. P all sts
BO, leaving a long tail.
To adapt the acorn cap to a bell that is larger or smaller, knit more or fewer increase rnds. You'll want to stop increasing when the cap just reaches the widest point at the top of the bell, then P one or more even rnds so it curls over the bell's edge.
CO 9 on DPNs and knit in the following rnds:
Rnds 1-2. K all sts
Rnd 3. [Kfb, K1, Kfb] 3 times (15 sts)
Rnd 4. Kfb, K3, Kfb] 3 times (21 sts)
Rnd 5. [Kfb, K5, Kfb] 3 times (27 sts)
Rnd 6. [Kfb, K7, Kfb] 3 times (33 sts)
Rnd 7. P all sts
BO, leaving a long tail.
To adapt the acorn cap to a bell that is larger or smaller, knit more or fewer increase rnds. You'll want to stop increasing when the cap just reaches the widest point at the top of the bell, then P one or more even rnds so it curls over the bell's edge.
Assembly:
Stitch up any gaps in the body left from where the DPNs met.

Position and place the safety eyes on the head. Attach the ears, each one just above each eye, and embroider a nose. Lightly stuff the head with yarn scraps or stuffing.

Use the long tails from the CO portion of these pieces to assist in the following assembly.
Attach the head to the body.
Attach the head to the body.

Sew by slipping the stitches between the pingpong ball and the knitted cover. Use straight pins to assist with the positioning. I like to start with one side, working around the back toward the front.
Sew all the way around the neck using the body yarn. Switch to white yarn to attach the belly, spreading it flat across the front and stitching around the edges.

Next, attach the CO portion of tail on the opposite end of the body, just a small distance away from the center. You’ll want the tip of the tail to come near or slightly higher than the height of the head.

Attach the front paws, but take care lining them up so the ends almost touch in front of the belly.
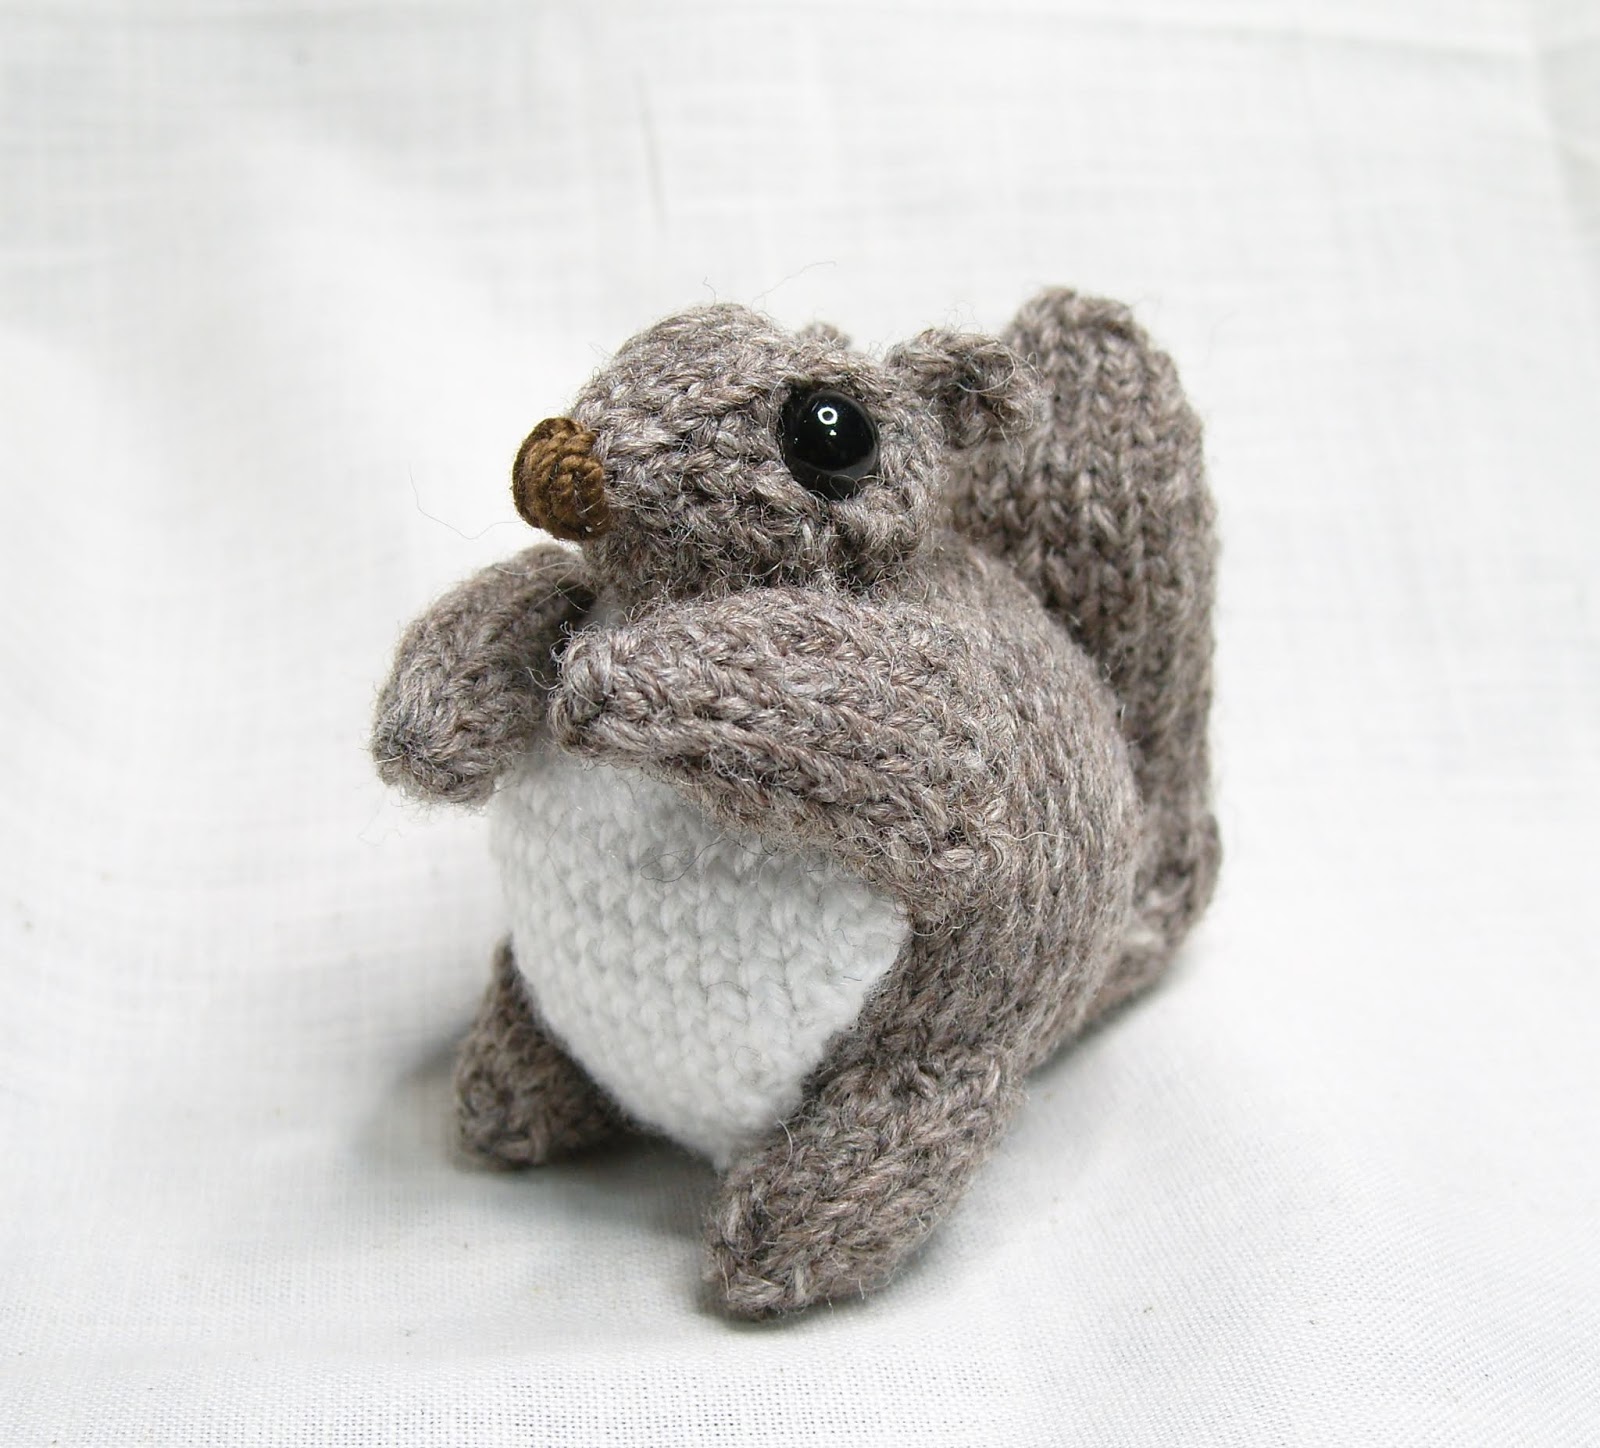
Start by sewing the CO edge right where the edge of the belly meets the body. Sew all the way around.

Repeat that process for the back feet, aligning the CO end with the edge of the belly.
Place the acorn cap over the bell. Secure it in place by weaving the BO tail in between the four splits in the sides and the opening at the top of the bell.

Once the cap is thoroughly fixed in place, use a few stitches to attach it to the squirrel’s front paws.
Use a length of cord or ribbon to create a loop to suspend the squirrel from a hook or branch.
 |
| This squirrel is dedicated to Jen because of our shared appreciation of incredibly fat squirrels. Thank you, Jen, and thank you for also coming up with the name Rosemarsh-- even if you were just making fun of me. |
Happy knitting as always, friends. Maybe there will be more ornament updates before the year is out--perhaps a redux on an old pattern or two. We'll see how yet another dark, chilly knitting season shakes up.


