Pages

December 8, 2016

Fat Cat Bauble - Free Pattern

Wow, so it's been nearly a year. Whoops.

I haven't updated because I've been doing a lot of learning this year. I've been exploring stitches and techniques, working on new patterns, getting them on Ravelry, and also learning how to process fiber and spin yarn. 

I've also learned that I am a crappy blogger as I find that I just like making things or writing, not making things and then writing about them, which is pretty essential to blogging. I also write full-time, for work, in the same place I live. When my day ends, I like to get as far away from my desk as possible. So there ya go. Sorry it's been quiet. 

I'll try to do a general update on the stuff I've been learning before the end of the year, but if not, who cares? 2016 is dumb. It is the year I married Puffits and it's been a good bird-feeder year--lots of new visitors--but otherwise, fuck 2016. Good riddance. Let it be gone with no new blog updates if that's how it goes, except for this free ornament pattern. Please enjoy this Fat Cat Bauble.


 It's less inspired by traditional Christmas baubles than it is by a design on one of my favorite mugs. 


To make one, you’ll first need a plastic bauble form. Glass could work but you’ll need to apply some pressure towards the end, so that could be risky. Foam could work as well or just stuffing the bauble with polyfill, but you’ll likely need to create additional decreases at the end if it doesn’t have the metal spring cap.
  

Choose the bauble size first since the circumference is a pretty important measurement. If the knit is too small, you’ll never get it around the bauble and be able to close it up. If it’s too large, your cat will look a little saggy--not that there's anything wrong with saggy cats. 

This pattern will work on an 8-inch (20.32 cm) circumference or a 10-inch (25.4 cm) circumference plastic bauble but it could be adjusted.  

If you already have a knit bauble pattern that works for you, feel free to skip over mine. I understand there are lots of them out there. The cat's features are added after the bauble portion is complete, so you can incorporate them onto an alternative pattern.

For an 8-inch bauble, use U.S. size 3 (3.25mm) DPNs and a sock or fingering weight yarn.  Gauge: 11 sts for 11 row = 1 inch (2.54cm)

For a 10-inch bauble, use U.S. size 5 (3.75mm) DPNs and a DK or worsted/medium weight yarn. Gauge: 8 sts for 8 rows = 1 inch (2.54cm)

About 30-40 yards should be ample for this project. If you’re not stuffing the bauable, you’ll only need a small amount of polyfill, but you can easily use yarn scraps to fill the head, paws, and tail.


You can complete this pattern with just four DPNs, but it’s much easier with five. Distributing the stitches evenly across four DPNs once you reach Rnd. 5 makes it much easier to keep track of the repeats, but it can be done on three. You'll also need a needle for assembly, embroidery floss or contrasting yarn for the nose, safety eyes--or felt, buttons, beads, etc. as eye alternatives.

Here are the techniques and abbreviations

Knit-in-the-Round
Knit Straight
Cast On

Knit (K)

Purl (P)

Knit Front and Back (Kfb)

Knit Two Together (K2tog)
Slip-Slip-Knit (ssk)

Bind Off
Draw-Through
Round (Rnd)

Total stitches are indicated within ( ) after increase and decrease rounds. Stitches to be repeated are indicated within [ ].

So here we go, starting with the bauble, working from the bottom up:

Cast on 6 sts and knit in the round:
  • Rnd 1: K all sts.
  • Rnd 2: [Kfb] 6 times (12 sts)
  • Rnd 3: [Kfb] 12 times (24 sts)
  • Rnd 4: K all sts
  • Rnd 5: [Kfb, K4, Kfb] 4 times (32 sts)
  • Rnd 6: K all sts
  • Rnd 7: [Kfb, K6, Kfb] 4 times (40 sts)
  • Rnd 8: K all sts
  • Rnd 9: [K3, Kfb, K2, Kfb, K3] 4 times (48 sts)
  • Rnd 10: K all sts
  • Rnd 11: [Kfb, K10, Kfb] 4 times (56 sts)
  • Rnd 12: K all sts
  • Rnd 13: [K4, Kfb, K4, Kfb K4] 4 times (64 sts)
  • Rnd 14: K all sts
  • Rnd 15: [Kfb, K14, Kfb] 4 times (72 sts)
  • Rnds 16 - 20: K all sts
  • Rnd 21: [K5, ssk, K4, K2tog, K5] 4 times (64 sts)
  • Rnd 22: K all sts
  • Rnd 23: [ssk, K12, K2tog] 4 times (56)
  • Rnd 24: K all sts
  • Rnd 25: [K4, ssk, K2, K2tog, K4] 4 times (48 sts)
  • Rnd 26: K all sts.
  • Rnd 27: [ssk, K8, K2tog] 4 times (40 sts)

Slip the knit over the bauble. Stretch your work upwards as you work the next rounds. If you’re going to stuff your bauble instead, do so now.    
  • Rnd 28: [K2tog] 20 times (20 sts)
  • Rnd 29: [K2tog] 10 times (10 sts)

Cut the yarn, leaving a long tail, and draw through the remaining stitches.  Draw up tightly so the knit fits snugly around the bauble’s opening. If the bauble does not have a spring cap, close it up with an additional decrease row before drawing through.    

The Head
It’s worked in the round, starting from the nose. 

Cast on 4 sts.
  • Rnd 1: [Kfb] 4 times (8 sts)
  • Rnd 2: K3, [Kfb] twice, K3 (10 sts)
  • Rnd 3: K3, Kfb, K2, Kfb, K3 (12 sts)
  • Rnd 4: K4, Kfb, K2, Kfb, K4 (14 sts)
  • Rnd 5: K4, Kfb, K4, Kfb, K4 (16 sts)
  • Rnd 6: K5, Kfb, K4, Kfb, K5 (18 sts)
  • Rnd 7: K5, Kfb, K6, Kfb, K5 (20 sts)
  • Rnd 8: K7, Kfb, K4, Kfb, K7 (22 sts)
  • Rnd 9: K6, [Kfb, K1] 5 times, K6 (27 sts)
  • Rnds 10-11: K all sts

Bind off, leaving a long tail to later help in attaching the head to the bauble.


Ears
We need two. They are knit straight.

Cast on 10 sts.  Leave a long tail for assembly and seaming. 
  • Row 1: P all sts.
  • Row 2: K3, [K2tog] twice, K3 (8 sts)
  • Row 3: P2tog, P4, P2tog (6 sts)
  • Row 4: K2, K2tog, K2 (5 sts)

Bind off. Fold in half and seam down the side so you have a thick, pointed ear.


Paws
We need four. They are knit in the round.  

Cast on 12 sts. Leave a long tail for assembly.
  • Rnds 1 – 4: K all sts.
  • Rnd 5: [K1, K2tog] 4 times (8 sts)
  • Rnd 6: [K2tog] 4 times (4 sts)

Draw through. Weave in end.


The Tail
Finally. It’s also knit in the round, worked from the base to the tip.

Cast on 12 sts. Leave a long tail for assembly.
  • Rnds 1-15: K all sts.
  • Rnd 16:  [K1, K2tog] 4 times (8 sts)
  • Rnds 17-18: K all sts.
  • Rnd 19: [K2tog] 4 times (4 sts)

Draw through. Leave a long tail to be used as part of the assembly process.


To assemble:

Start by adding the cat’s eyes. Once you’ve got your eyes positioned and fixed as desired, sew the base of the cat’s ears so they sit on top of the cat’s head. I find lining them up with the eyes usually looks spot-on.

Embroider a nose. If you want your cat to have whiskers, stiff nylon beading thread works well and looks nice on a lit tree, but it’s a pain to attach in an exact place and tends do what it wants.  When I add whiskers, I do so by making a latch hook knot and trimming to the desired length. Lightly fill the front of the head with polyfill or yarn scraps. 


Attach the bind-off end to a desired place on the bauble. Slip your needle between the knit and the surface of the bauble to attach.  Pin in place if you need some help keeping things stable.

Then, attach the legs.

Finally, get that tail on there. Centered between the two hind legs is a good place, about equal height of the cat’s head. Again, it never hurts to pin everything first to try different placements.  Use the bind-off yarn to curve and sew the cat’s tail into the body so its fixed in place. This step is optional, but I think it creates a more balanced, rounded look.   


And there ya go, the perfect décor or gift for a lover of rotund cats. Leave it up all year!  

If your bauble has a spring cap and a wide-enough opening, you can pop in one of these little LED craft thingies for balloons and such to make it look like your cat ate a string of lights or got into some radioactive cat food. Oh no! That’s a bad kitty! But you sure look festive!


December 21, 2015

Knit A Donut Ornament - Free Pattern

I'm not sure if I'll ever find myself saying I enjoy Christmas, at least not overall. It's just not my type of holiday. I know it's supposed to be your favorite as a kid but Halloween always held that title for me and probably always will.

As I grew up, the season's ability to excite and enchant was gradually lost in the the crescendo of stress, debt, and questions that repeat, year after year. Questions? Yes, the Christmas season always brings out the same questions from me. Chief among the are: "Why are we still doing this?", "Aren't we too old for this?", "Why don't I enjoy this?", "Does anyone actually enjoy this?", "How can anyone afford to keep doing this?", "Really, what's the point at this point?"

But this year, things are a little different. I don't know what it is-- and it's certainly not the weirdly warm weather, with which I'm none too pleased-- but this year, I find myself embracing those little elements of Christmas that I do enjoy and from where my more fond Christmas memories stem. One of them is making things. Indeed, I love the crafty part of this season. That said, I don't make most gifts anymore. One year, the pressure literally had me in tears. It's just not worth it. And if I want to make someone something, I do so and I give it to them regardless of occasion.

I do still love making ornaments though.

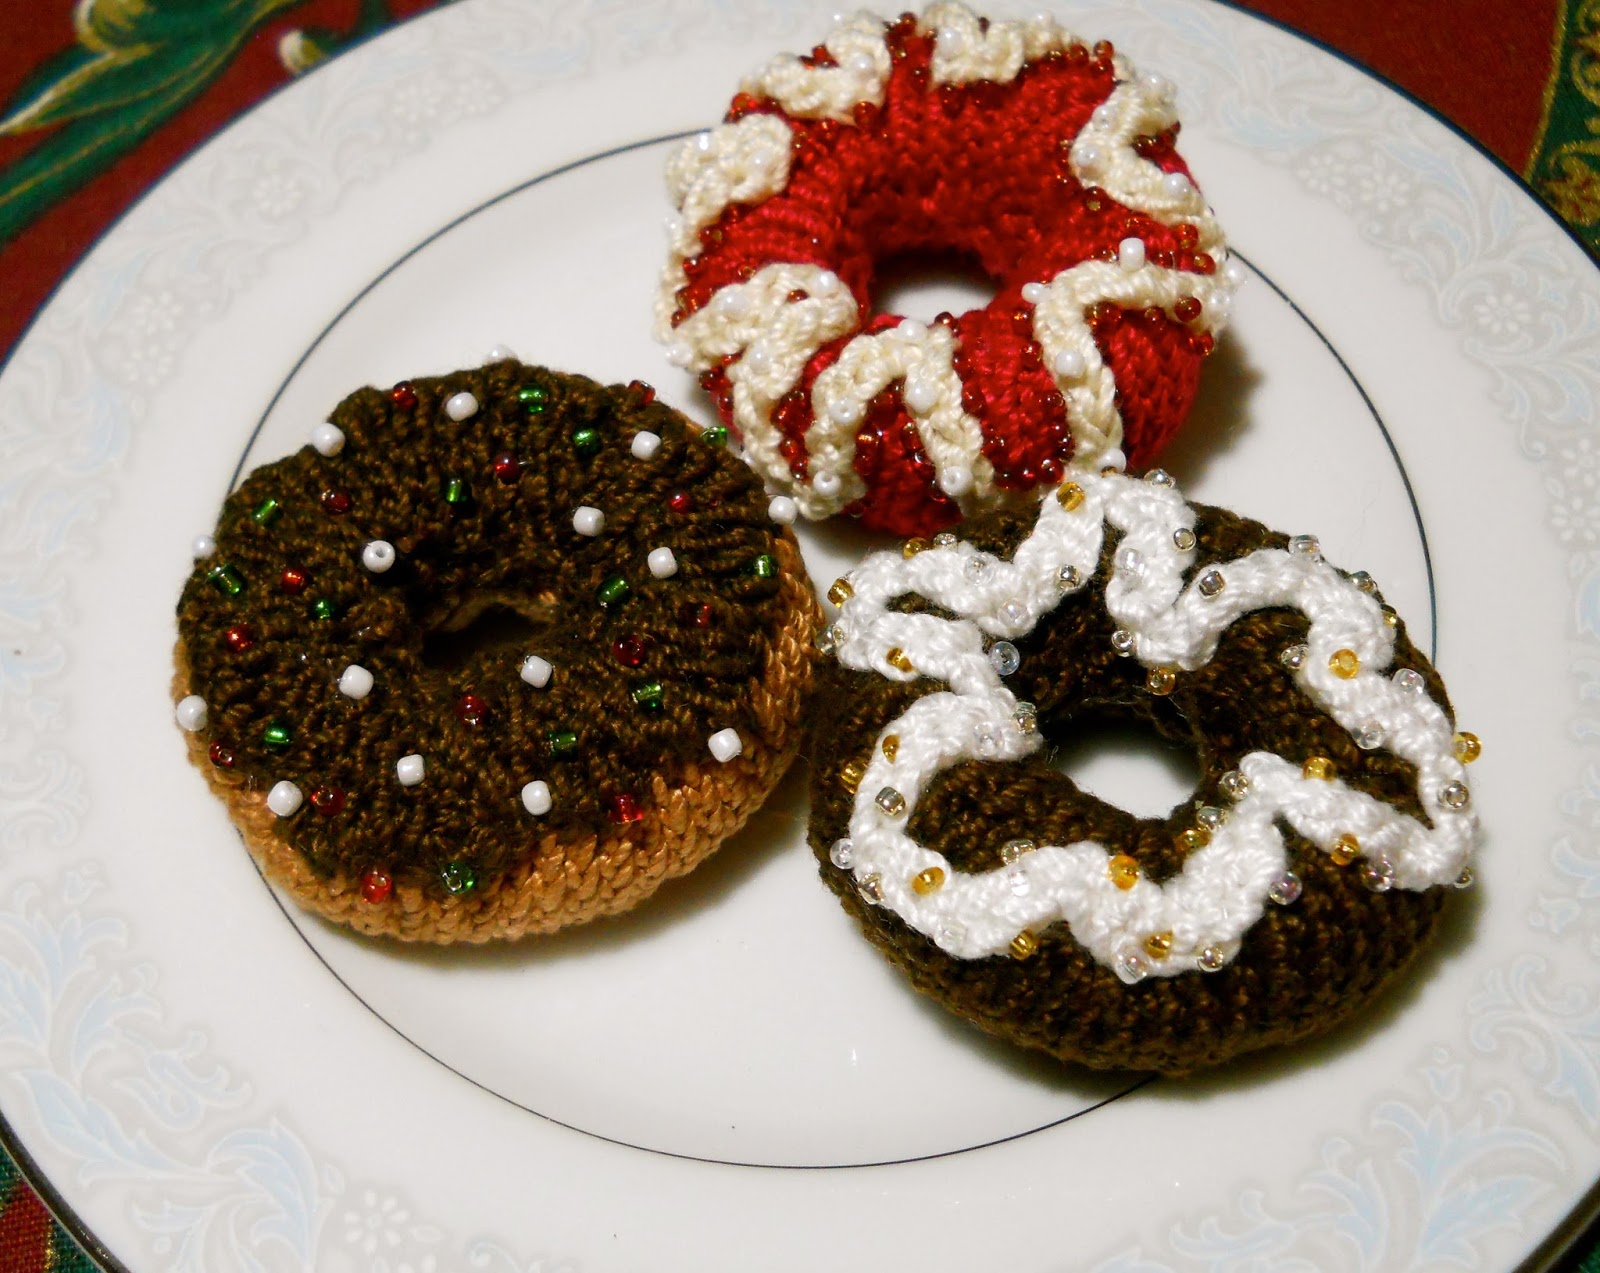
I love ornaments that are fairly quick to make, can be easily customized by switching up just a few things, and don't look half bad when left out all year. That's what I've tried to do with this donut pattern.


What do donuts have to do with Christmas? I guess they could be considered the modern equivalent of the those traditional beaded fruit ornaments that hung from my grandparents' trees. Exotic produce was an exciting holiday treat back then. Today, perhaps that's better summed up with a donut. Or maybe it's just a donut. Does everything have to be a statement?

Also, you can knit this donut for any reason. For New Years, you could make a plate of them and put message of dieting encouragement underneath each one. Knit them as a last minute hostess gift, make pretend food for a play kitchen, or stuff one with cat nip for a kitty toy (I'd leave the beads off for those last two uses).    
They're also nice if you're a Simpsons fan.

The pattern specifics are below. If you decide to make one, I hope it's an enjoyable part of your season. And regardless of what this time of year does or doesn't mean to you, and however you happen to feel about it, I hope it's better than you hope, not as bad as you dread, and that your 2016 is superior to this year, because 2015 seriously sucked!

I knit my donuts using size 1 (2.25 mm) DPN needles and Aunt Lydia's crochet thread in Fashion 3 weight, because that's what I use for almost every amigurumi I make lately. If you decide to do the same, you'll end up with a donut that's about 2" in diameter and 1/2" high.

As for additional supplies, you'll need a small amount of batting to stuff the donut; beads, a beading needle and beading cord if you want to add sprinkles; a needle for assembly; and ribbon or cord from which to suspend the donut--if you want to make an ornament. It also helps to have a crochet hook, chopstick, or similar tool to assist with the stuffing process.

The donut is knit in one piece and the frosting/icing is knit separately then attached.


Here are the techniques you'll need:

Knit-in-the-Round
Cast On (CO)
Knit (K)
Purl (P)
Knit Front and Back (Kfb)
Knit Two Together (K2tog)
I-Cord
Bind Off

Total stiches are indicated within ( ) after increase and decrease rounds. Stitches to be repeated are indicated within [ ].

To knit the "body" of the donut, cast 24 sts on to 3 DPNs. Knit the following rounds:

Rnds 1- 5: K all sts.
Rnd 6: [K1, Kfb] 12 times (36 sts)
Rnd 7: [K2, Kfb] 12 times (48 sts)
Rnd 8: [K7, Kfb] 6 times (54 sts)
Rnds 9 - 14: K all sts
Rnd 15: [K7, K2tog] 6 times (48 sts)
Rnd 16: [K2, K2tog] 12 times (36 sts)
Rnd 17: [K1, K2tog] 12 times (24 sts)
Rnds 18-22: K all sts

Bind off.

Once you've finished knitting, push the first few rounds up through the center until the cast-on edge meets with the bind off edge. It should look a bit like a deflated inner tube.

Here's a rushed illustration of it:


You'll then stitch the cast-off edge and bind-off edges together, but only stitch about a quarter of the way around to start. Stuff that portion and then stitch a little more. You should start to see the donut shape emerge. Stuff and stitch in this fashion until you can barely access the interior. Then use a crochet hook, chopstick, or other tool to get that last bit of stuffing in there before your seam is closed and complete.

It's up to you how you'd like to ice or frost your donut. If you want a smooth top of icing, follow the steps below.

Leave a long cord and cast on 12 sts. Distribute on 3 DPNs and knit-in-the-round as follows:

Rnd 1: [K1, Kfb] 6 times (18 sts)
Rnd 2: [K1, Kfb] 9 times (27 sts)
Rnd 3: [K2, Kfb] 9 times (36 sts)
Rnd 4: [K2, Kfb] 12 times (48 sts)
Rnd 5: [K3, Kfb] 12 times (60 sts)

Bind off, leaving a long tail.

Use the cast-on tail to attach the frosting piece to the inner wall of the donut hole. Knot to secure and weave in end.

Use the bind-off tail to attach the frosting to the outer portion of the donut. Knot to secure and weave in end.


For a piped ribbon of icing, you just need to knit an i-cord that's approximately double the circumference of your donut. Use pins to plan the design of your icing and ensure your i-cord is long enough to do the job. Then make a few stitches at each bend to hold the design in place.


Add beads for a glittery, sprinkle-rich look. Suspend your donut from a loop of cord or just leave it as it is to be placed on a fancy plate.

December 11, 2015

Knit A Mushroom Sprite - Free Pattern

I'm trying to get a couple new patterns out before the new year. I don't really count this one among them since it is a pretty apparent inception of the puffball inspired fungisprite. Though, apparent as it is, it sure took me long enough to get the damn thing on the blog, but gimme a break people, it's gift season and my hands hurt.

Anyway, if you're going to make a knitting pattern based on a type of fungus, there's a more obvious route to take and I've gone ahead and done that with this one.


The mushroom sprite, duh.

If you want to make a friend for your fungisprite or you think this design somehow makes more sense, just follow the pattern below. As with the fungisprite, you're more than welcome to throw a little support my way and get a portable, presentable PDF download of the mushroom sprite pattern. Many thanks to anyone who decides to do so.

"You're a real fungi!"
 "You're terrible. Don't touch my leaf."

And again, if you make one and send me a photo in the comments, I'll email you the pattern of your choice for free!

Ready? Mush!


Yarn and Needles: To make your mushroom sprite teeny, tiny (about 1.5" high) use Aunt Lydia’s Crochet Thread Fashion 10 on four U.S. size 00 (1.75mm) double pointed needles (dpns). Be warned, it's a super thin and finicky combo, so I can understand if want to scale that up a bit. Fashion 3 and size 1 (2.25 mm) work well too but you can use any type of yarn and appropriately sized needles.  You’ll need a main color for the body and a contrasting color to make the mushroom cap.

Extras: Batting, safety eyes, tapestry needle for assembly. Beads, buttons, or embroidery can be used in place of safety eyes.

Gauge: Pfftt…gauge.

Techniques:
 Knit-in-the-Round
 Cast On (CO)
 Knit (K)
 Purl (P)
 Knit Front and Back (Kfb)
 Knit Two Together (K2tog)
 I-Cord
Bind Off

The mushroom sprite is made in separate portions: the body, the mushroom cap, feet and arms--as you can see from this dismembered fellow in the photo.


Total stiches are indicated within ( ) after increase and decrease rows/rounds. Stitches to be repeated are indicated within [ ].


Body

With your main color, CO 6 stitches (sts). Leave a long tail, which will later come into use during assembly. Knit-in-the-round as follows:

 Round 1: K1, [Kfb] 5 times (11 sts)
 Round 2: [K1, Kfb] 5 times, K1 (16 sts)
 Round 3: [K2, Kfb] 5 times, Kfb (22 sts)
 Round 4: [K1, Kfb] 11 times (33 sts)
 Round 5: [K5, Kfb] 5 times, K3 (38 sts)
 Rounds 6 - 13: K all sts
 Round 14: [K3, K2tog] 6 times, K1, K2tog (30 sts)
 Rounds 15 – 16: K all sts
 Round 17: [K2, K2tog] 7 times, K2tog (22 sts)
 Rounds 18 - 19: K all sts
 Round 20: [K2, K2tog] 5 times, K2tog (16 sts)
 Rounds 21 - 24: K all sts
 Round 25: [K1, Kfb] 8 times (24 sts)
 Round 26: [K3, Kfb] 6 times (30 sts)

Bind off.

Mushroom Cap

With contrasting color, CO 6 sts and knit-in-the-round as follows:

 Round 1: Kfb in every st. (12 sts)
 Round 2: [K1, Kfb] 6 times (18 sts)
 Round 3: [K2, Kfb] 6 times (24 sts)
 Round 4: [K3, Kfb] 6 times (30 sts)
Round 5: [K4, Kfb] 6 times (36 sts)
 Rounds 6 - 7: K all sts.


Bind off, leaving a long tail for the assembly portion.

If you're using safety eyes, pop those suckers in now.  Stuff the body of your mushroom sprite so it’s plump but not overstuffed. It should be slightly squishy.

Attach the outer edge of the mushroom cap to the bind-off edge of the body using the tail from the cap. When roughly three quarters of the cap has been attached, add just a bit more stuffing so your mushroom cap forms a slight dome. Finish stitching the cap to the body. Knot to secure and weave in remaining yarn.

No! My brains!

Using a sharp tapestry needle, draw the long tail from the body’s bottom center to the back of the upper body to just below the mushroom cap.  


Pull the yarn so the bottom becomes slightly concave. This helps with stability. Secure with a single knot the lies between the stitch rows. Trim the tail as needed and weave in remaining yarn. Now move on to the….

Feet

Using the main color, CO 4 sts. Knit straight the following rows:

 Row 1: K1, Kfb twice, K1 (6 sts)
 Row 2: P all sts.
 Row 3: K all sts.
 Rows 4 – 10: Continue in stockinette stitch (P even rows, K odd rows)
 Row 11: K1, K2tog twice, K1 (4 sts)
Bind off

Fold foot in half and stitch around edge like so:


Repeat to make second foot.  Then make a couple of...

Arms

Using main color, CO 5 sts. Leave a long tail to later attach to body.

Knit as an i-cord for 5 rows.

To end, draw yarn through all sts. Repeat to make second arm.


Assembly

Attach feet to the bottom of the mushroom sprite at desired width.

Attach CO edge of arms to desired spot on body.  


Share your results and thoughts in the comments and have fun spreading your fungus!